
SpringBoot - Mybatis集成
Spring Boot集成Mybatis实操步骤
一、简介
以下摘自官网:
MyBatis 是一款优秀的持久层框架,它支持定制化 SQL、存储过程以及高级映射。MyBatis 避免了几乎所有的 JDBC 代码和手动设置参数
以及获取结果集。MyBatis 可以使用简单的 XML 或注解来配置和映射原生类型、接口和 Java 的 POJO为数据库中的记录。
(官方文档)
以下摘自Anchor:
一款Java程序猿用于操作关系型数据库的框架,遵循JPA标准,准确的说是JPA的一种具体实现。
当今两大巨头(Hibernate、Mybatis)之一,可以当做JDBC的升级版(Plus、Max、Pro)。
很牛逼、很多人用(俺们团队也在用),至于好不好用请自行判断。
优缺点。
二、使用
1.导入包
在pom.xml文件中引入下述必要的依赖包(版本可自主选择)。
<dependency>
    <groupId>mysql</groupId>
    <artifactId>mysql-connector-java</artifactId>
    <version>8.0.18</version>
</dependency>
<dependency>
    <groupId>org.mybatis.spring.boot</groupId>
    <artifactId>mybatis-spring-boot-starter</artifactId>
    <version>2.0.0</version>
</dependency>
2.基本配置
在resources文件夹下创建application.yml文件并进行下述配置。
注:application.yml与application.properties作用相同,但前者更加简洁、层次分明、更便于阅读,因此使用application.yml。
spring:
  datasource:
    url: jdbc:mysql://localhost:3306/dataBaseName?serverTimezone=UTC&useUnicode=true&characterEncoding=utf-8&useSSL=true
    username: root
    password: anchor#123
    driver-class-name: com.mysql.cj.jdbc.Driver

mybatis:
  type-aliases-package: anchor.mybatis.entity
  mapper-locations: classpath:mapping/*Mapper.xml

logging:
  level:
    anchor.mybatis.mapper: debug
其中:
1)”url: jdbc:mysql://localhost:3306/dataBaseName?serverTimezone=Shanghai&useUnicode=true&characterEncoding=utf-8&useSSL=true”
“localhost:3306”为数据库IP及端口(端口一般为3306),”dataBaseName”为要连接的数据库名称,其余不做修改;
2)”username“和”password“为数据库账号和密码(若忘记可重置);
3)”driver-class-name“:说明;
4)”type-aliases-package“:Java实体类所在包的位置;
5)”mapper-locations“:Mapper.xml所在的位置。”classpath:”这里可以理解为是”resources”目录;
6)”logging.level“:用于打印mybatis真实执行的sql语句。(包名: 日志级别) 例如 (anchor.mybatis.mapper: debug);
3.项目结构
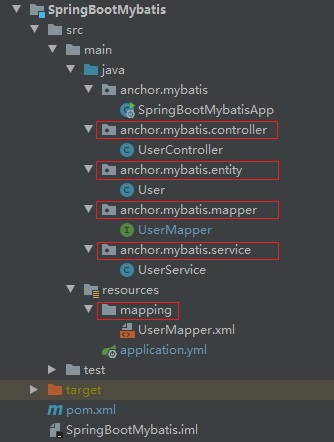
五类约定文件:
1)entity:约定存放Java实体类,这些类可与数据库中表对应也可不对应(由Mapper.xml中的映射关系决定);
2)mapper:约定存放命名以”Mapper”结尾的Java接口,这些接口是连通Java应用于数据库的桥梁,是Java应用操作数据库的入口;
3)service:业务操作处理层,对mapper接口查到的数据根据业务需要进行处理;
4)controller:与外界(请求)交互的门户,接收外界请求并调用service层的方法处理该请求;
5)mapping:mapping是一个Directory,约定放在resources文件夹下,用来存放命名以”Mapper”为结尾的xml文件,
在此类xml文件中编写SQL语句来实现mapper接口;
创建文件时请遵循上述约定将对应的文件放在对应的Package或Directory下!
三、细解
1.Entity
public class User{
    Long id;
    String name;
    Integer age;
}
2.Mapper
import org.springframework.stereotype.Repository;

@Repository
public interface UserMapper{
    List<User> findByNameAndAge(String username, int age);

    List<User> findByUser(User user);

    List<User> search(List<String> nameList);      //改方法名命名不规范
}
3.Mapper.xml
Mybatis根据配置在application.yml中“mybatis.mapper-locations”的值来定位Mapper.xml文件。
根据约定将此值设置为“classpath:mapping/Mapper.xml”(相当于resources/mapping/Mapper.xml)。
Mybatis的核心就在于Mapper.xml文件,Mybatis根据此类文件中的SQL语句对数据库进行CURD操作,并将操作结果映射到指定的Java类。
标签说明:
如下是XML中一个完整的标签,labelName是此标签的名字,property1、property2是该标签的属性,name1、name2分别是两个属性的名称,content是标签的内容。
<labelName property1="name1" property2="name2">
    content
</labelName>
1)xml的框架
以下是Mybatis xml的基础部分,必须有。标签 <mapper> 中的 namespace 用来绑定Java接口,需写对应Mapper接口的全路径。
<?xml version="1.0" encoding="UTF-8" ?>
<!DOCTYPE mapper PUBLIC "-//mybatis.org//DTD Mapper 3.0//EN" "http://mybatis.org/dtd/mybatis-3-mapper.dtd">
<mapper namespace="anchor.mybatis.mapper.UserMapper">
  <!-- 具体实现... -->
</mapper>
Tips:可将多个xml指向同一个接口,增删查改语句中的id不同即可。
例:接口为UserMapper.java,两个xml文件为UserMapper.xml和UserExtMapper.xml,可将两个xml中的namespace都指向这个UserMapper.java。
2)基本结果映射
说明:这里的映射是指将数据库的查询结果和Java类进行关联(数据库表到Java类的转换)。
<resultMap id="baseResultMap" type="anchor.mybatis.entity.User">
    <id column="id" property="id"/>
    <result column="name" property="name"/>
    <result column="age" property="age"/>
    <result column="description" property="description"/>
</resultMap>
标签 <resultMap> 用来对数据库字段和Java类属性进行映射,每个 <resultMap> 称为一个结果集。
a.<resultMap> 里的 id 用来标识此结果集,可任意填写(别太任意..);
b.<resultMap> 里的 type 用来绑定Java类,绑定之后Mybatis才能进行映射,填写类的全路径;
c.标签 <id> 和 <result> 都是用来将字段和属性进行绑定(<id> 并不是必须要绑定表的主键)。不同的是 <id> 标签表示的结果将是对象的标识属性,会在比较对象实例时用到,
并且能在进行缓存和嵌套结果映射的时候提高整体的性能;
d.标签<id>和<result>里的 column 是数据库表的字段名,property 是Java类的属性名;
Tips:
resultMap 可以继承,resultMap 可通过 extends 属性继承此xml或其他xml中的 resultMap。
extends 中值:<mapper> 标签中 namespace 的值 + 被继承的 resultMap 的 id。
<resultMap id="baseResultExtMap" type="anchor.mybatis.entity.User"
           extends="anchor.mybatis.mapper.UserMapper.baseResultMap"></resultMap>
3)高级结果映射
普通场景使用基本结果映射可解决大多数问题,但有些复杂场景诸如类的属性是另一个类,类的属性是集合等,映射关系较为复杂。
此时可使用 <association> 和 <collection> 标签,<association>用来映射Java类,<collection>用来映射集合。(详细介绍可参考此文)
<!--column不做限制,可以为任意表的字段,而property须为type 定义的pojo属性-->
<resultMap id="唯一的标识" type="映射的pojo对象">
  <id column="表的主键字段,或者可以为查询语句中的别名字段" jdbcType="字段类型" property="映射pojo对象的主键属性" />
  <result column="表的一个字段(可以为任意表的一个字段)" jdbcType="字段类型" property="映射到pojo对象的一个属性(须为type定义的pojo对象中的一个属性)"/>
  <association property="pojo的一个对象属性" javaType="pojo关联的pojo对象">
    <id column="关联pojo对象对应表的主键字段" jdbcType="字段类型" property="关联pojo对象的主席属性"/>
    <result  column="任意表的字段" jdbcType="字段类型" property="关联pojo对象的属性"/>
  </association>
  <!-- 集合中的property须为oftype定义的pojo对象的属性-->
  <collection property="pojo的集合属性" ofType="集合中的pojo对象">
    <id column="集合中pojo对象对应的表的主键字段" jdbcType="字段类型" property="集合中pojo对象的主键属性" />
    <result column="可以为任意表的字段" jdbcType="字段类型" property="集合中的pojo对象的属性" />
  </collection>
</resultMap>
4)传参
①传参指将xxMapper.java接口里方法中的参数传入xxMapper.xml,使用 #{paramName} 或 ${paramName}。
②#{paramName} 与 ${paramName} 的区别:
二者都相当于一个占位符,当传入实际值时该值会替代占位符。假设传入值为”id”。
select * from users order by ${paramName} asc
#{paramName}:  select * from users order by 'id' asc
${paramName}:  select * from users order by  id  asc       二者之间相差一对单引号。
以下三类传参基本满足日常需求。
Ⅰ.简单参数
多参数时Mybatis会根据占位符 #{} 中的名字来匹配Mapper.java里方法中的参数。xml中等号左边 name 为数据库表中字段名,等号右边 username 为接口中的参数名。
List<User> findByNameAndAge(String username, int age);
<select id="findByNameAndAge" resultMap="baseResultMap">
    select * from users where name = #{username} and age = #{age}
    <!- select * from users where name = #{myName} and age = #{age} -> 运行报错,无法找到到参数myName
</select>
Tips:
①当只有一个参数时,接口中参数名可与xml中 #{} 中的名字不同;(不建议)
②不论参数个数,Mybatis会自动识别传入参数类型,因此不用在标签中显式指定 parameterType 的值;
③当数据库中age的类型是int,接口中定义age的类型为String时,也可查询成功;(不建议)
④3.4.1之前版本的Mybatis,多参数时需要用@Param来指定绑定到xml中的参数。(详情)
Ⅱ.类参数
①顾名思义,传入的参数是一个Java类。
②可以通过属性 parameterType 显式指定入参的类型(值为类的全路径),也可不指明,Mybatis会自行处理。
③#{} 内的内容必须与类的属性名相同,否则无法匹配到。
List<User> findByUser(User user);
<select id="findByUser" resultMap="baseResultMap">    <!- 未使用parameterType显式指明 ->
    select * from users where name = #{name} and age = #{age}
</select>
Ⅲ.集合参数
①用foreach来处理集合中的数据;
②xml中collection的值与Java方法中的参数名相同;(单参数时可不同,不建议)
③xml中item代表foreach当前遍历的对象,如果item是个类时,可以用item.name来获取name的值;
④xml中open与close代表在foreach开始和结束时添加的字符;
⑤xml中separator代表在这次遍历结果和上次遍历结果间添加的分隔符;
List<User> search(List<String> nameList);
<select id="search" resultMap="baseResultMap">
    select * from users
    where name in
    <foreach collection="nameList" item="item" open="(" close=")" separator=",">
        #{item}
    </foreach>
</select>
最终执行的sql:
select * from users where name in ('name1', 'name2', 'name3')
5)SQL片段
可在xml中使用 <sql> 标签将重复的sql语句提取出来,通过 <include refid=”something”> 标签引用,来达到重用的目的。
<sql id="snippet">                         <!-- 提取sql片段 -->
    <if test="id!=null and id!=''">
        id=#{id}
    </if>
    <if test="name!=null and name!=''">
        and name like '%${name}%'
    </if>
</sql>

<select id="findUserList" parameterType="anchor.mybatis.entity.User" resultType="anchor.mybatis.entity.User">
    select * from user where
    <include refid="snippet"/>     <!-- 使用<include>标签进行引用,通过refid进行关联 -->
</select>
6)CURD
使用 <insert>、<delete>、<select>、<update> 四个标签并编写SQL语句进行增删查改。
下篇文章中收录了一些常用的CURD。
4.ServiceImpl
import org.springframework.stereotype.Service;
import javax.annotation.Resource;

@Service
public class UserServiceImpl implements UserService {

    @Resource
    private UserMapper userMapper;

    @Override
    public List<User> getByNameAndAge(String name, int age) {
        return userMapper.findByNameAndAge(name, age);
    }
}
5.Controller
@RestController
@RequestMapping("/user")
public class UserController {

    @Resource
    private UserService userService;

    @GetMapping("/getByNameAndAge")
    public List<User> getByNameAndAge(@RequestParam String name, @RequestParam int age) {
        return userService.getByNameAndAge(name, age);
    }
}
